React Drag & Drop メモ
React Drag & Drop メモ
主要ライブラリは3つ
※2022/5 末時:React18 で実現したければ React DnD を使うか自前で実装するかがよさそう
各ライブラリ所感
React DnD
- drag & drop 中の見た目:半透明になるのでよい
- シンプルなものであればこれで十分
- HTML5 の API setDragImage を利用して作られているためパフォーマンス面もよい
- 多少凝ったものを作ろうと思うと大変そう(例えばかんばんボードの複数のタスクが入っている枠の方を Drag できるようにする等。そもそもできるかまで調べられていない)
react-beautiful-dnd
- drag & drop の見た目:リッチ
- 2022/5 末、React18 には対応していない(React18 で動かしたければ React.StrictMode を消せば動くらしい?そんな状態では個人なら自己責任で済むが製品等には使えない)。対応は水面下?で進められてはいそうだが、まだ先になりそう (使いたければ React17 を使うしかない)
- 多少凝ったものでも容易に作れそう(かんばんボードの複数のタスクが入っている枠の方を Drag できるようにするのは容易にできる)
React-Draggable
- 最低限だけの可能性があるので、必要なものは自分で実装をする必要がありそうで大変そう(以下できるかまでは未確認)
その他:自前で実装(OSS に依存したくなく腕があるなら)
- (参考)簡単な例:https://github.com/trananhtuat/react-draggable-list (2020 年、ちょっと古い)
参考(コードリーディング)
以下のコードを読んでみた
目的:React DnD 使用した場合の、よくあるかんばんボードの Todo、Done といった Group 間の Card 移動をどうやって実現してるのか確認したかったため
- React DnD でかんばんボードを作ってみる ※ソースもデモも記事にリンクがある
※Group、Card という表現は適切ではないかもしれないが上記のコードと用語を合わせるために揃える
※以降、ディスる意図等は一切なく単純に思ったことを書き留めるだけのためご容赦を
- Group 間で Card は跨いで移動する = アプリ全体で参照するから ベースとなるコンポーネント:App.tsx で管理している → 分かる
- Card の一覧を 1 配列で管理、Group と属する Card を別オブジェクトで管理
- Card 一覧の配列内は、Group 順に並べていて、Group コンポーネントに Card 一覧の配列内の各 Group の先頭インデックス(firstIndex) を渡すことで、Card 一覧の配列での管理を実現している -> これが分かりにくかった
- map(key: Group 名、 value: Card の配列)で管理した方がいいのではないか?
- もしくは、Group の情報を持つデータクラス?を用意した方がよいのではないか?(必要ならそれらを管理するクラスも)
- firstIndex より Group 名等 各 Group を識別する一意な値を渡して制御するようにした方が分かりやすそう
- ※リファクタして試せ
- Card 一覧の配列内は、Group 順に並べていて、Group コンポーネントに Card 一覧の配列内の各 Group の先頭インデックス(firstIndex) を渡すことで、Card 一覧の配列での管理を実現している -> これが分かりにくかった
- 以下のコードの「forward」「backward」のコメント制御が最初分からなった(開発者ツールでデバッグしてやっと分かったレベル)
- 以下の部分は Group 間の Card 移動を担当させている (だからこその
dragItem.group === groupType。変数名から変数に格納されるデータを誤解して、コードだけ見てもこの役割が掴かみきれなかった)- targetIndex: targetGroupFirstIndex
- items: itemsInGroup とかの方がまだ伝わる?
- Draggable.tsx は Group 内の Card 移動にまかせている
- Group 間移動は、Group.tsx で移動先の Group の末尾に放り込むだけ(目には見えないが)。あとは Draggable.tsx で Drag 時の位置を変えてる
- 以下の部分は Group 間の Card 移動を担当させている (だからこその
useRef を使っているコンポーネントを重ねての制御ができている(Group と Draggable)ので、Group 自体を drag&drop できるようにすることはできるかもしれない(ただし少々大変そう)
// Group.tsx
const [, ref] = useDrop({
  accept: ItemTypes,
  hover(dragItem: ItemWithIndex) {
    const dragIndex = dragItem.index;
    if (dragItem.group === groupType) return;
    const targetIndex =
      dragIndex < firstIndex
        ? // forward
          firstIndex + items.length - 1
        : // backward
          firstIndex + items.length;
    onMove(dragIndex, targetIndex, groupType);
    dragItem.index = targetIndex;
    dragItem.group = groupType;
  },
});

// data.ts
export type Item = {
  id: number;
  type: ItemType;
  group: GroupType;
  contents: Contents;
};
export type ItemWithIndex = Item & {
  index: number;
};
refs
ついでに面白そうなの見つけた(あまり更新されてないけど)
React コードフォーマット(ESLint + Prettier + TypeScript)
React コードフォーマット(ESLint + Prettier + TypeScript)
XXXX 番煎じ。3 年前に webpack で一から設定したことがあるが年月経っている上、React でやるのは初めてなので残す
Code Format
- Prettier : コードスタイルのフォーマッタ。 ESLint とは異なり、コードスタイルのみをフォーマット
- ESLint : 問題や構文エラーを検索し、コードスタイルをよりきれいにする
※max-len、no-mixed-spaces-and-tabs、keyword-spacing、カンマスタイルなどのルールは、Prettier でよく使われているフォーマットルール。
※no-unused-vars、no-extra-bind、no-implicit-globals、prefer-promise-reject-errors などのルールは ESLint の一般的なルール。
ref: ESLint + Prettier + Typescript and React in 2022 ※eslint-plugin-prettier 使ってるので良い手順か怪しい
以下 npx create-react-app task-mgmt-app-clone --template=typescript を行ったあとの手順
ESLint インストール
npm install eslint --save-dev
npx eslint --init

Need to install the following packages:
  @eslint/create-config
Ok to proceed? (y) y

? How would you like to use ESLint? ...
  To check syntax only
  To check syntax and find problems
> To check syntax, find problems, and enforce code style

√ How would you like to use ESLint? · style
? What type of modules does your project use? ...
> JavaScript modules (import/export)
  CommonJS (require/exports)
  None of these

? Which framework does your project use? ...
> React
  Vue.js
  None of these

? Does your project use TypeScript? » No / Yes

? Where does your code run? ...  (Press <space> to select, <a> to toggle all, <i> to invert selection)
√ Browser
√ Node

? How would you like to define a style for your project? ...
> Use a popular style guide
  Answer questions about your style

? Which style guide do you want to follow? ...
> Airbnb: https://github.com/airbnb/javascript
  Standard: https://github.com/standard/standard
  Google: https://github.com/google/eslint-config-google
  XO: https://github.com/xojs/eslint-config-xo

? What format do you want your config file to be in? ...
> JavaScript
  YAML
  JSON

? Would you like to install them now? » No / Yes

? Which package manager do you want to use? ...
> npm
  yarn
  pnpm
↓ 必要なものを入れる
npm install -D eslint-plugin-react@latest @typescript-eslint/eslint-plugin@latest @typescript-eslint/parser@latest
npm install -D eslint-plugin-import @typescript-eslint/parser eslint-import-resolver-typescript
npm i --save-dev eslint-plugin-unused-imports
npm i --save-dev eslint-config-airbnb-typescript
npm i -D eslint-plugin-import
// npx install-peerdeps --dev eslint-config-airbnb
Prettier インストール & ESLint 設定
npm i -D prettier eslint-config-prettier
eslintrc.js 編集。
module.exports = {
  env: {
    browser: true,
    es2021: true,
  },
  extends: [
    'plugin:react/recommended',
    'airbnb',
+   'airbnb-typescript'
+   'airbnb/hooks',
+   'plugin:@typescript-eslint/recommended',
+   'plugin:@typescript-eslint/recommended-requiring-type-checking',
+   'prettier',
  ],
  parser: '@typescript-eslint/parser',
  parserOptions: {
    ecmaFeatures: {
      jsx: true,
    },
    ecmaVersion: 'latest',
    sourceType: 'module',
+    tsconfigRootDir: __dirname,
+    project: ['./tsconfig.json'],
  },
  plugins: [
    'react',
    '@typescript-eslint',
+   'unused-imports', // 使っていないimportを自動で削除用
  ],
+ "ignorePatterns": [
+   ".eslintrc.js"
+ ],
  rules: {
+   'no-use-before-define': 'off', // 関数や変数が定義される前に使われているとエラーになるデフォルトの機能off
+   '@typescript-eslint/no-use-before-define': 'off',
+   'import/prefer-default-export': 'off', // named exportがエラーになるので使えるようにoff
+   '@typescript-eslint/no-unused-vars': 'off', // unused-importsを使うため削除
+   'unused-imports/no-unused-imports': 'error', // 不要なimportの削除
+   'unused-imports/no-unused-vars': [ // unused-importsでno-unused-varsのルールを再定義
+     'warn',
+     { vars: 'all', varsIgnorePattern: '^_', args: 'after-used', argsIgnorePattern: '^_' },
+   ],
+   "react/function-component-definition": [ // アロー関数以外受け付けない設定
+     2,
+     {
+       namedComponents: "arrow-function",
+       unnamedComponents: "arrow-function",
+     },
+   ],
+   'no-param-reassign': [ // パラメーターのプロパティ変更を許可
+     2,
+     { props: false }
+   ],
+   'import/extensions': [ // importのときに以下の拡張子を記述しなくてもエラーにしない
+     'error',
+     {
+       js: 'never',
+       jsx: 'never',
+       ts: 'never',
+       tsx: 'never',
+     },
+   ],
+   'react/jsx-filename-extension': [ // jsx形式のファイル拡張子をjsxもしくはtsxに限定
+     'error',
+     {
+       extensions: ['.jsx', '.tsx'],
+     },
+   ],
+   'react/react-in-jsx-scope': 'off', // import React from 'react'が無くてもエラーを無くす
+   'react/prop-types': 'off', // TypeScriptでチェックしているから不要。offにする
+   'no-void': [ // void演算子の許可
+     'error',
+     {
+       allowAsStatement: true,
+     },
+   ],
+ },
+ settings: {
+   'import/resolver': {
+     node: {
+       paths: ['src'],
+       extensions: ['.js', '.jsx', '.ts', '.tsx']
+     },
+   },
+  },
};
補足
- アロー関数
以下を設定しないと
"react/function-component-definition": [ // アロー関数以外受け付けない設定
  2,
  {
    namedComponents: "arrow-function",
    unnamedComponents: "arrow-function",
  },
],
以下の書き方ができない(ESLint に function App() の形にフォーマットされる)
export const App = () => (
  <div className="App">
    <header className="App-header" />
  </div>
);
- 不要 import
plugings に 'unused-imports' を入れ忘れると、import 文で unused-imports/no-unused-imports のエラーが出る
plugins: [
  'react',
  '@typescript-eslint',
  'unused-imports' // 使っていないimportを自動で削除用
],
- import 整列
refs
★【VSCode】React と TypeScript、ESLint、Prettier、Airbnb で環境構築する手順
いつのまにか eslint-plugin-prettier が推奨されないものになってた
- とっくの昔(2020 年位)に非推奨になっている(忘れないように)
import の整列をしたいときは以下参照。(自身のプロジェクトのフォルダ構成に合わせて好きな順になるよう pathGroups を指定することになる)
OpenID Connect 概要まとめ (In progress)
OpenID Connect 概要まとめ (In progress)
随時追加
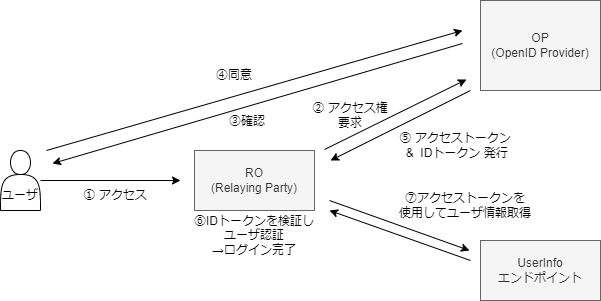
OIDC イメージ
OIDC = OAuth + IDトークン + UserInfoエンドポイント
Link Stack
SpeckerDeck - 30分でOpenID Connect完全に理解したと言えるようになる勉強会
IDトークンが分かれば OpenID Connect が分かる
gRPC (by golang)
gRPC (by golang)
動機:SOAのとあるシステムで、新規のデータを新規DBに持ち、かつそのデータを既存サービス&新設サービスの2つ(a) が利用するようになるため、新規のデータ群の管理を担う新規サービス(b)を立て、(a)(b)両者のやりとりに gRPC を用いるのが適切と思ったため Study
gRPC とは
Google が開発した RPC フレームワークで、gRPC を使うと異なる言語で書かれたアプリケーション同士が gRPC により自動生成されたインターフェースを通じて通信することが可能。 データのシリアライズには Protocol Buffers を使用。
RPC(Remote Procedure Call):
- ネットワーク上の他の端末と通信するための仕組み。
- 「クライアント−サーバー」型の通信プロトコルであり、サーバー上で実装されている関数(Procedure、プロシージャ)をクライアントからの呼び出しに応じて実行する技術
- (RESTのようにパスとメソッドの指定ではなく)メソッド名と引数を指定する
- (リソースと機能(関数)の紐づけがされるため、時折 REST API 設計で発生するリソースと機能のマッピングで困る点が解消される?)
利点/欠点
利点:
- HTTP/2による高速な通信が可能。(データはバイナリデータでやり取りする仕様)
- Protocol Buffersによるスキーマファーストの開発。protoファイルというIDLからコードの自動生成が可能。
- 様々なストリーミング方式の通信が可能。
欠点:
- クライアントとサーバの両方に特別なソフトウェアを導入しなければならない
- クライアントとサーバが別環境の場合、protoファイルの変更の追随を解決しなければならない
- gPRCで生成されたコードはクライアントとサーバのビルドプロセスに組み込まなければならない
- HTTP2通信ができる環境が必要
適したケース
- マイクロサービス間の通信
- バックエンド間は恩恵が多く得られる
- モバイルユーザが利用するサービス
- 通信量削減
- 速度が求められる場合
APIとの比較 (個人の主観)
- 大量データ送受信
- REST APIの場合:制御面で多少手間がかかる?
- サーバへ送信:multipart/form-data (分割送信) or Base64
- ref: WebAPI でファイルをアップロードする方法アレコレ
- multipart/form-data は GraphQLのようにJSONでやり取りせざるを得ない場合使えない。Base64 で送信 ref: GraphQL APIで画像をアップロードする
- サーバから取得:streamingで1レスポンスで分割送信、206応答しAPIを複数回実行してもらっての分割取得、等
- サーバへ送信:multipart/form-data (分割送信) or Base64
- gRPCの方が得意(ストリーミング方式で仕組化されている上、HTTP2通信により速度も速い)
- REST APIの場合:制御面で多少手間がかかる?
- 仕様変更追従
環境構築
protocol buffer install (Windowsの場合):
https://github.com/protocolbuffers/protobuf/releases から zip取得。環境変数にbinのパス追加
Go plugins install:
go install google.golang.org/protobuf/cmd/protoc-gen-go@latest
go install google.golang.org/grpc/cmd/protoc-gen-go-grpc@latest
確認
protoc --version
protoc-gen-go --version
protoc-gen-go-grpc --version
go get -u google.golang.org/grpc
Protocl Buffers
| # | 利点 | 欠点 |
|---|---|---|
| JSON | ・あらゆる言語で利用可能 ・複雑な形式(配列/ネスト)を扱える |
・データスキーマを強制できない ・データサイズが大きくなりがち |
| Protocol Buffers | ・型が保証される ・データサイズは小さい(バイナリ) |
・複雑すぎる構造には不向き ・一部言語は未対応 |
.protoを作成 → 開発言語のオブジェクト自動生成 → (送信時データを)バイナリ形式へシリアライズ
.proto ファイル
書き方
message
- フィールドのフォーマット: <フィールドの型> <フィールド名> = <タグ番号>; (例:
int32 id = 1;) - スカラー型:https://developers.google.com/protocol-buffers/docs/proto3#scalar
- ネストが可能
- フィールドのフォーマット: <フィールドの型> <フィールド名> = <タグ番号>; (例:
tag
- (Protocol Buffersは) フィールドをタグ番号で識別。一意な番号
- 最小値:1,最大値:229 - 1 (536,870,911)
- 19000~19999 は予約番号のため使用不可
- 1~15番は1byteのためパフォーマンス良。よく使うフィールドを割り当てるのが吉
- タグは連番にする必要がない
enum (列挙型)
- タグ番号が0から始まる
各種フィールド
- repated: 配列相当のフィールド。複数の要素を含めることが可能
- map:連想配列相当のフィールド。
- oneof:いずれかの型を持つフィールド。repatedフィールドにはできない
import/package が可能
syntax = "proto3";

package employee

impot "proto/date.proto";

message Employee {
  int32 id = 1;
  string name = 2;
  string email = 3;
  Occupation occupation = 4;
  repeated string third_party_account = 5;
  map<string, Company.Product> products = 6;
  oneof profile {
    string text = 7;
    URL url = 8;
  }
  date.Date joinedDate
}

enum Occupation {
  UNKNOWN = 0;
  ENGINEER = 1;
  DESIGNER = 2;
  MANAGER = 3;
}

message Company {
  message Product {}
}
message URL {
}
package date;

message Date {
  int32 year = 1;
  int32 month = 2;
  int32 day = 3;
}
コンパイル
protoc -I. --go_out=. proto/*.proto
gRPC用のコードも出力
protoc -I. --go_out=. --go-grpc_out=. proto/*.proto
gRPC 4つの方式 & Servicea定義
Unary RPC
message SayHelloRequest {}
message SayHelloResponse {}

service Greeter {
    rpc SayHello (SayHelloRequest) returns (SayHelloResponse);
}
Server Streaming RPC
- 1リクエスト・複数レスポンス方式
- クライアントはサーバから送信完了の信号が送信されるまでStreamのメッセージを読み続ける
message SayHelloRequest {}
message SayHelloResponse {}

service Greeter {
    rpc SayHello (SayHelloRequest) returns (stream SayHelloResponse);
}
Client Streaming RPC
message SayHelloRequest {}
message SayHelloResponse {}

service Greeter {
    rpc SayHello (stream SayHelloRequest) returns (SayHelloResponse);
}
Bidirectional Streaming RPC
message SayHelloRequest {}
message SayHelloResponse {}

service Greeter {
    rpc SayHello (stream SayHelloRequest) returns (stream SayHelloResponse);
}
Interceptor
- メソッド前後に処理を挟むための仕組
- 認証やロギング、監視、バリデーションなど複数のRPCで共通して行いたい処理で利用する
- サーバ側/クライアント側どちらも対応
- サーバ
- UnaryServerInterceptor
- StreamServerInterceptor
- クライアント
- UnaryClientInterceptor
- StreamClientInterceptor
- サーバ
以下を満たす関数を実装
type UnaryServerInterceptor func(
  ctx context.Context
  req interface{}
  info *UnaryServerInfo // メソッド等のサーバ情報
  handler UnaryHandler  // クライアントからコールされるhandler
) (resp interface{}, err error) // resp: handlerからのレスポンス
Interceptor追加方法
// サーバ
server := grpc.NewServer(
  grpc.UnaryInterceptor(myInterceptor())
)

// クライアント
connection, err := grpc.Dial(
  "localhost:50001",
  grpc.WithUnaryInterceptor(myInterceptor())
)
ロギング
func logging() grpc.UnaryServerInterceptor {
    return func(ctx context.Context, req interface{}, info *grpc.UnaryServerInfo, handler grpc.UnaryHandler) (resp interface{}, err error) {
        log.Printf("request: %+v", req)
        resp, err = handler(ctx, req)
        if err != nil {
          return nil, err
        }
        log.Printf("response: %+v", resp)
        return resp, nil
    }
}
認証
https://github.com/grpc-ecosystem/go-grpc-middleware
例:
- サーバ側
func main() {
  // :
  server := grpc.NewServer(
        grpc.UnaryInterceptor(
            grpc_middleware.ChainUnaryServer(
                buildLogging(),
                grpc_auth.UnaryServerInterceptor(authorize),
            ),
        ),
    )
  pb.RegisterFileServiceServer(server, &Server{})
  // :
}

func authorize(ctx context.Context) (context.Context, error) {
    token, err := grpc_auth.AuthFromMD(ctx, "Bearer")
    if err != nil {
        return nil, err
    }

    if token != "xxxxx" {
        return nil, status.Error(codes.Unauthenticated, "token is invalid")
    }
    return ctx, nil
}
- クライアント側
func callServerMethod() {
    md := metadata.New(map[string]string{"authorization": "Bearer xxxxx"})
    ctx := metadata.NewOutgoingContext(context.Background(), md)

  // :
}
認証エラー出力(クライアント側)
2022/05/25 21:35:44 rpc error: code = Unknown desc = bad token
exit status 1
エラーハンドリング
公式ドキュメント: https://www.grpc.io/docs/guides/error/
例:
- サーバ側
return nil, status.Error(codes.NotFound, "not found")
- クライアント側
  res, err := client.serverMethod(ctx, &pb.ServerRequest{})
    if err != nil {
        resErr, ok := status.FromError(err)
        if ok {
            if resErr.Code() == codes.NotFound {
                log.Fatalf("Error Code: %v, Error Message: %v", resErr.Code(), resErr.Message())
            }
        } else {
            log.Fatalln("unknown error")
        }
  } else {
    log.Fatalln(err)
  }
Deadlines
サーバからレスポンスを待つ時間(超えたらタイムアウトでエラー)
例:
- クライアント側
func callServerMethod() {
    ctx, cancel := context.WithTimeout(ctx, 3*time.Second)
    defer cancel()

  res, err := client.serverMethod(ctx, &pb.ServerRequest{})
  if err != nil {
        resErr, ok := status.FromError(err)
    if resErr.Code() == codes.DeadlineExceeded {
          log.Fatalln("deadline exceeded")
    }
    // :
  }
}
SSL通信化
例:
- サーバ側
func main() {
  // :
  credentials, err := credentials.NewServerTLSFromFile(
        "ssl/localhost.pem",
        "ssl/localhost-key.pem",
    )
    if err != nil {
        log.Fatalln(err)
    }

    server := grpc.NewServer(
        grpc.Creds(credentials),
    // :
  )
  // :
}
- クライアント側
func main() {
  certfile := "xxxxxx/rootCA.pem"
  creds, err := credentials.NewClientTLSFromFile(certFile, "")
  conn, err := grpc.Dial("localhost:50000", grpc.WithTransportCredentials(creds))
  // :
}
ref
環境構築:
参考:
Try Code: https://github.com/Symthy/golang-practices/tree/main/go-gRPC
shell 1行目のおまじない shebang(シバン)
shell 1行目のおまじない shebang(シバン)
bash を使用するか sh を使用するかの指定+α
#!/bin/bash: 固有の機能が使える。移植性等考えなくていいならこちらを使うと便利#!/bin/sh: 環境に拘らず使える。(ただしUbuntuの場合はdashという物が使われるらしい)
オプションの意味
#!/bin/bash -eu → オプション指定は set -eu と同じ
refs
シェルスクリプトの1行目に書くおまじないで使える便利オプション集
指定できるオプション -e と -u についてわかる
→ bash スクリプトの先頭によく書く記述のおさらい
参考:/bin と /usr/bin の違い
→ Linuxのディレクトリ構造
Refactor Diary 1 (Java: APIレスポンス解析)
Refactor Diary 1 (Java: APIレスポンス解析)
例:ユーザロールチェック
ユーザ情報はAPIにより以下のようなものが取れるものとする
// API Response Data Model
public class User {
    private String userName;
    private List<RoleEnum> roles;
    // 他にも複数のフィールドがあるものとする
    // Getter,Setter等省略
}
リファクタ前
public class UserRoleValidator {

    private final Logger logger = LoggerFactory.getLogger(UserRoleValidator.class);
    private final ApiClient apiClient;  // OkHttpClient ラッパークラスとする
    private static final List<RoleEnum> REQUIRED_ANY_ROLES = Lists.of(RoleEnum.Admin, RoleEnum.Manage);

    UserRoleValidator(ApiClient apiClient) {
        this.apiClient = apiClient;
    }

    // APi実行~レスポンスボディ変換~ロールチェックまで全部入り
    public void execute() {
        OkHttp.Response response = apiClient.getUser(userName);
        if (!response.isSuccessful()) {
            LOGGER.error("Response Status Code: " + response.code());
            if (Objects.nonNull(response.body())) {
                LOGGER.error("Error Response Contents: " + response.body().string());
            }
            LOGGER.error("message");
            throw new IOException("message");
        }
        User user = new Gson().fromJson(response.body().string(), User.class)
        List<Role> roles = Objects.isNull(user.getRoles()) ? List.of() : user.getRoles();
        if (roles.isEmpty() ||
                REQUIRED_ANY_ROLES.stream().anyMatch(r -> roles.contains(r))) {
            LOGGER.error("message");
            throw new InsufficientRoleException("message");
        }
    }
}
何が問題か
- (レスポンスに対して共通で行うような) 共通処理が入り込み、流用できない
- ロールチェックのパターン網羅するテストを書くにあたり、全テストで apiClient をmockし、返すresponse body data を指定する必要がある等、テスト自体が見にくくなる
リファクタ後
public class UserRoleValidator {

    private static final Logger LOGGER = LoggerFactory.getLogger(UserRoleValidator.class);
    private final ApiClient apiClient;

    UserRoleValidator(ApiClient apiClient) {
        this.apiClient = apiClient;
    }

    public void execute(String userName) {
        var apiResponse = new DataStoreApiResponse(apiClient.getUser(userName));
        if (apiResponse.isSuccessful()) {
            LOGGER.error("message");
            throw new IOException("message");
        }
        validateUserRole(apiResponse.deserialize());
    }

    public void validateUserRole(User user) {
        if (RequiredRoles.isSatisfy(user.getRoles())) {
            LOGGER.error("message");
            throw new InsufficientRoleException("message");
        }
    }
}

// API Response Data Model
public class User {
    private String userName;
    private List<RoleEnum> roles;
    // Getter,Setter等省略
}

// レスポンスに対する共通処理の集約
class DataStoreApiResponse {

    private static final Logger LOGGER = LoggerFactory.getLogger(DataStoreApiResponse.class);
    private final isSuccessful;

    DataStoreApiResponse(OkHttp.Response response) {
        if (!response.isSuccessful()) {
            LOGGER.error("Response Status Code: " + response.code());
            if (Objects.nonNull(response.body())) {
                LOGGER.error("Error Response Contents: " + response.body().string());
            }
            isSuccessful = false;
            return;
        }
        isSuccessful = true;
    }

    boolean isSuccessfull() {
        return isSuccessful;
    }

    int getStatusCode() {
        return response.code();
    }

    <T> T deserialize(Class<T> cls) {
        return new Gson().fromJson(response.body().string(), cls)
    }
}

// 知識の確立
public class RequiredRoles {

    private static final List<RoleEnum> REQUIRED_ANY_ROLES = Lists.of(RoleEnum.Admin, RoleEnum.Manage);

    boolean isSatisfy(User user) {
        List<Role> roles = Objects.isNull(user.getRoles()) ? List.of() : user.getRoles();
        if (roles.isEmpty()) {
            return false;
        }
        return REQUIRED_ANY_ROLES.stream().anyMatch(r -> roles.contains(r));
    }
}
先にどういうところでどういうテストが必要になるかを考えて、テストしやすい部品を作る
- 不良を作りこみやすいような重要な箇所(上記例ならロールチェック処理)を見極め
- そこに対して、容易にテストができるよう部品に分ける
それにより、複数の重要な知識が1か所に混在し、結果として見通しが悪くなるようなことが防げる。テストも見やすくなり、どういったケースがあり得るのか等テストから読み取りが容易になる